Gnat-GtkAda2021 on Ubuntu Installation
Updated 1/02/2024
Confirmed Ubuntu versions:
21.04 LTS
22.04 LTS
Gnat, GtkAda: Adacore 2021
PC: HP Envy-17t-S100, Shuttle DH310
Pre-install packages
NOTE: These 6 items should be processed previously.
~$ sudo apt install gprbuild
~$ sudo apt install make
~$ sudo ln -s /usr/bin/make /usr/bin/gmake (NOTE1: make and gmake, NOTE2)
~$ sudo apt install libncurses5
~$ sudo apt install libc6-dev (If this library was not installed, gnatmake will cause link errors.)
~$ sudo apt install libgtk-3-dev (NOTE3: this item is new for GtkAda installation)
(NOTE2: “ln: failed to create symbolic link ‘/usr/bin/gmake’: File exists”
If this error message is displayed, ignore it.
(The other NOTE: XDG_RUNTIME_DIR was not required for this version)
(The other NOTE: gcc was not required for this version)
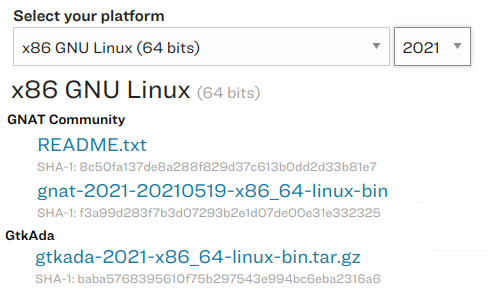
Download GNAT-Community and GtkAda
Adacore download site: https://www.adacore.com/download/more
Select platform: “X86 GNU Linux (64bit)” and Year to download the installers.
Install GNAT Community
Set permission executable for the downloaded installers.
$ chmod +x gnat-2021-20210519-x86_64-linux-bin
$ chmod +x gtkada-2021-x86_64-linux-bin.tar.gz
Double click the application on the file-manager
filename: gnat-2021-20210519-x86_64-linux-bin
or
Use Terminal with the next command, they output the same result.
~/Downloads$ sudo ./gnat-2021-20210519-x86_64-linux-bin
Ignore if this warning is displayed:
“QStandardPaths: XDG_RUNTIME_DIR not set, defaulting to ‘/tmp/runtime-root'”
[sudo] password : (–enter Ubuntu password)
Next
[/opt/gtkada] /usr/gnat (–set installation directory, I changed /opt/gtkada to /usr/gnat)
Next Next Next Install
Installation here and finished.
This message is displayed on the final screen:

Finish
The installation is finished.
Add PATH at the bottom of the file ~/.bashrc
——————————————————–
export PATH=/usr/gnat/bin:$PATH
———————————————————
Re-start Terminal
~$ sudo apt update
~$ sudo apt upgrade
Test GNAT Community
Build Ada Hello
Create test directory and change directory:
~$ mkdir ada && cd ~/ada && mkdir test1 && cd ~/ada/test1
This is the simplest sample source:
File name: hello.adb
with Ada.Text_IO; use Ada.Text_IO;
procedure Hello is
begin
Put_Line ("Hello World");
end Hello;
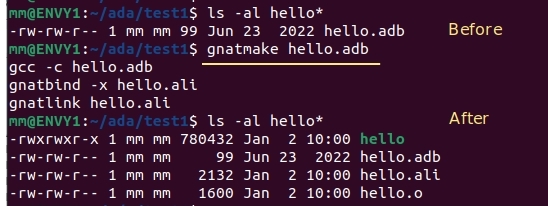
Build #1, with gnatmake tool: gnatmake hello.adb
or
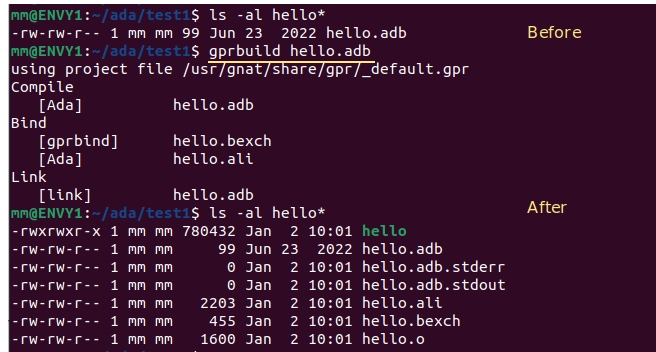
Build #2, with gprbuild tool: gprbuild hello.adb
or
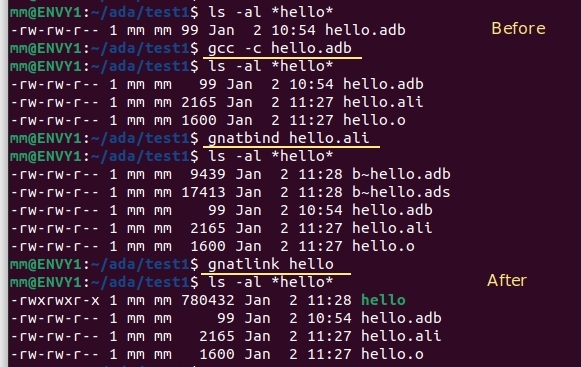
Build #3,
- gcc -c hello.adb
- gnatbind hello.ali
- gnatlink hello
Test GNAT Studio IDE
Delete hello, *.ali *.o files in test1 directory.
Startup GNAT Studio: ~/ada/test1$ gnatstudio.
If “Set the color theme” screen is displayed. Choose “Default” or else as you like.
It happens when starting up gnatstudio at the first time.
+Create-new-project
Choose Basic—Simple Ada Project—Next
Change Main Name “main”==>”hello”
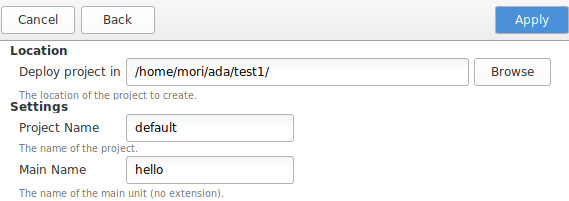
Browse to display source adb file in the left pane.
Copy and paste the source text with the same above hello.adb if it is just a template.
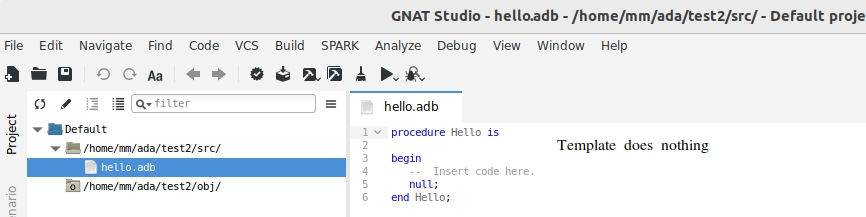
Build and Run

(Output file size is same the output of gprbuild)
The project file is created automatically: default.gpr
project Default is
    for Source_Dirs use ("src");
    for Object_Dir use "obj";
    for Main use ("hello.adb");
end Default;
Install GtkAda
Set executable and extract the downloaded package file.
Do installation:
~/Downloads/gtkada-2021-x86_64-linux-bin$ sudo ./doinstall
Password (–enter Ubuntu password)
[/opt/gtkada] /usr/gnat
(Set installation directory name. I changed “/opt/gtkada/” to “/usr/gnat” as GNAT-community)
(If you use a different directory, refer Gnat-GtkAda2020 on Ubuntu Installation)
Y
– – – – – – build – – – – – – –
The final message is displayed as the next, but you cannot follow it.
GtkAda has now been installed on your machine.
You can enter the GtkAda environment by doing:
“/usr/gnat/bin/gtkada-env.sh”
The auto created gtkada-env.sh does not work properly on Ubuntu. We will create new gtkada-env.sh.
GtkAda Environment Setting
Create new gtkada-env.sh file. (This file is same the 2019 and 2020 version GtkAda)
————- Create ~/gtkada-env.sh ————————————–
prefix="/usr/gnat"
LD_LIBRARY_PATH_64=$prefix/lib:$LD_LIBRARY_PATH_64
PKG_CONFIG_PATH=$prefix/lib/pkgconfig:/usr/lib64/pkgconfig:/usr/lib/pkgconfig:/usr/share/pkgconfig
GDK_PIXBUF_MODULE_FILE=$prefix/lib/gdk-pixbuf-2.0/2.10.0/loaders.cache
GDK_PIXBUF_MODULEDIR=$prefix/lib/gdk-pixbuf-2.0/2.10.0/loaders/
FONTCONFIG_FILE=$prefix/etc/fonts/fonts.conf
XDG_DATA_DIRS=$prefix/share:$XDG_DATA_DIRS
XDG_CONFIG_DIRS=$prefix/etc:$XDG_CONFIG_DIRS
GSETTINGS_BACKEND=memory
GLADE_BASE_DIR=$prefix
GPR_PROJECT_PATH=$prefix/lib/gnat:$GPR_PROJECT_PATH
export LD_LIBRARY_PATH_64
export PKG_CONFIG_PATH
export GDK_PIXBUF_MODULE_FILE
export GDK_PIXBUF_MODULEDIR
export FONTCONFIG_FILE
export XDG_DATA_DIRS
export XDG_CONFIG_DIRS
export GSETTINGS_BACKEND
export GLADE_BASE_DIR
export GPR_PROJECT_PATH
Add one line at the bottom (keep the export… setting line) of ~/.bashrc to call gtkada-en.sh
# GNAT and GtkAda
export PATH=/usr/gnat/bin:$PATH
. ./gtkada-env.sh
NOTE . ./gtkada-env.sh (dot space dot slash gtkada-env.sh)
~$ sudo apt update
~$ sudo apt upgrade
Close console and re-open it.
NOTE: gedit or some other graphic applications won’t work after the installation of the gtkada-env.sh.
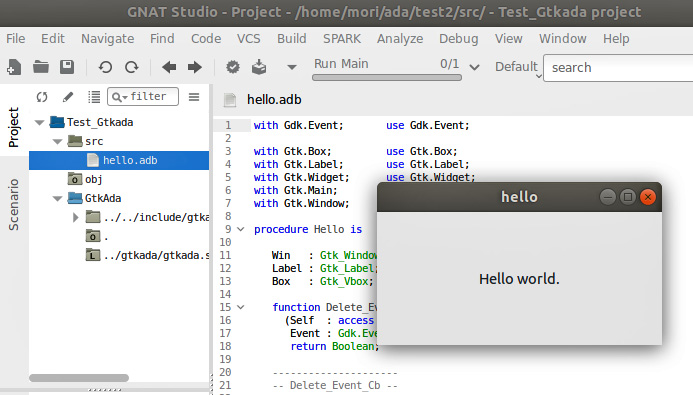
Test Build GtkAda Hello with GnatStudio
~/ada$ mkdir test2 && cd test2 (This sample uses “test2” instead of “test1”)
~/ada/test2$ gnatstudio


I changed the Project-Name and Main-Name as follows.
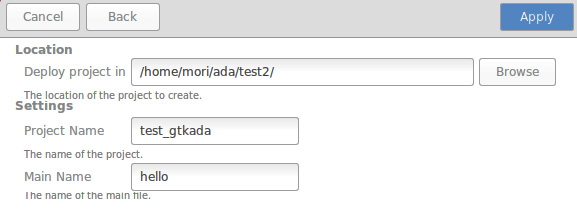
Press “Apply” button, then the simple application source is created automatically.
Press “Build-all” and “Run”.
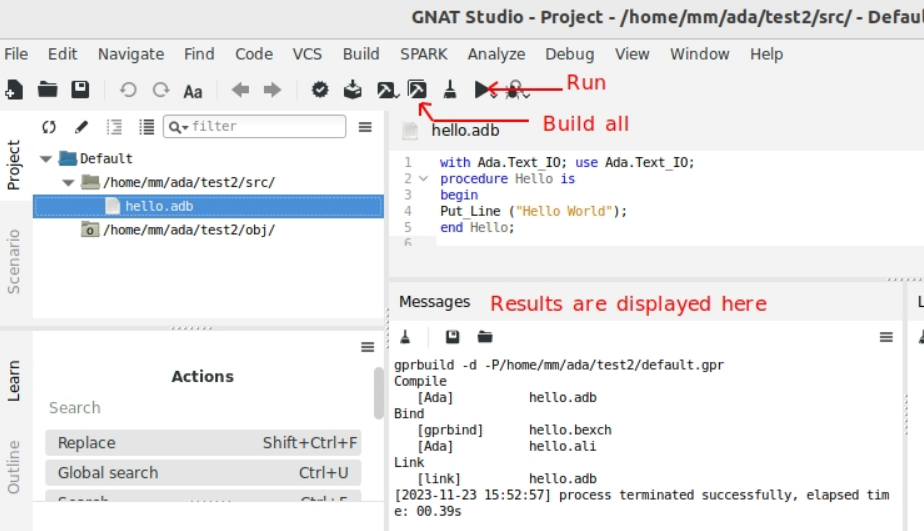
The application Hello window pops up.
Created source file and exec file


Automatically created the project file: test_gtkada.gpr
with "gtkada";

project Test_Gtkada is

   for Source_Dirs use ("src");
   for Object_Dir use "obj";
   for Main use ("hello.adb");

end Test_Gtkada;
Testgtk
The application package Testgtk is included in GtkAda and it was built in the final stage of the installation already.
It is under the original installer files “gtkada-2021-x86_64-linux-bin/testgtk/testgtk”.
You can run it with ./testgtk command.
It includes most of the GtkAda commands to evaluate their functionalities. We can use it to evaluate or health-check our GtkAda development environment. Each GtkAda command sample is written in a lot of small files in the testgtk directory.
How to build Testgtk whole package
This is the testgtk package file structure:
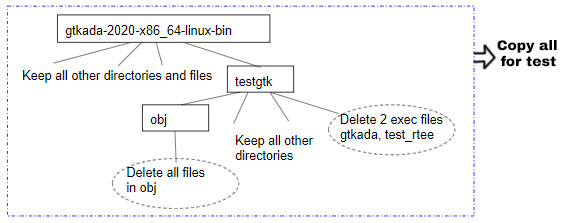
1) Copy all of the GtkAda installation files to the other directory.
Here copy to ~/ada/ directory.
~$ cp -r -a ~/Downloads/gtkada-2021-x86_64-linux-bin ~/ada/
2) Move to ada/gtkada-2021-x86_64-linux-bin/testgtk/.
Delete next 2 object files which were previously created.
testgtk and test_rtree
Delete all of the files in the testgtk/obj directory.
3) Move to the testgtk directory and do gprbuild
~/ada/gtkada-2021-x86_64-linux-bin/testgtk$ gprbuild
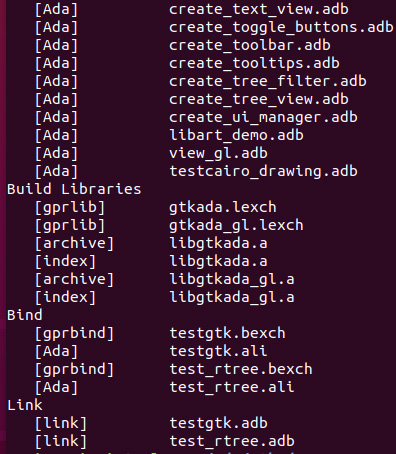
The files are created successfully and the file sizes are almost the same.
testgtk original: 15.0 MB (14,952,896 bytes) ===> New file 15.0 MB (14,950,456 bytes)
test_rtee original: 5.6 MB (5,613,968 bytes) ===> New file 5.6 MB (5,613,936 bytes)
Execute testgtk
~/ada/gtkada-2021-x86_64-linux-bin/testgtk$ ./testgtk
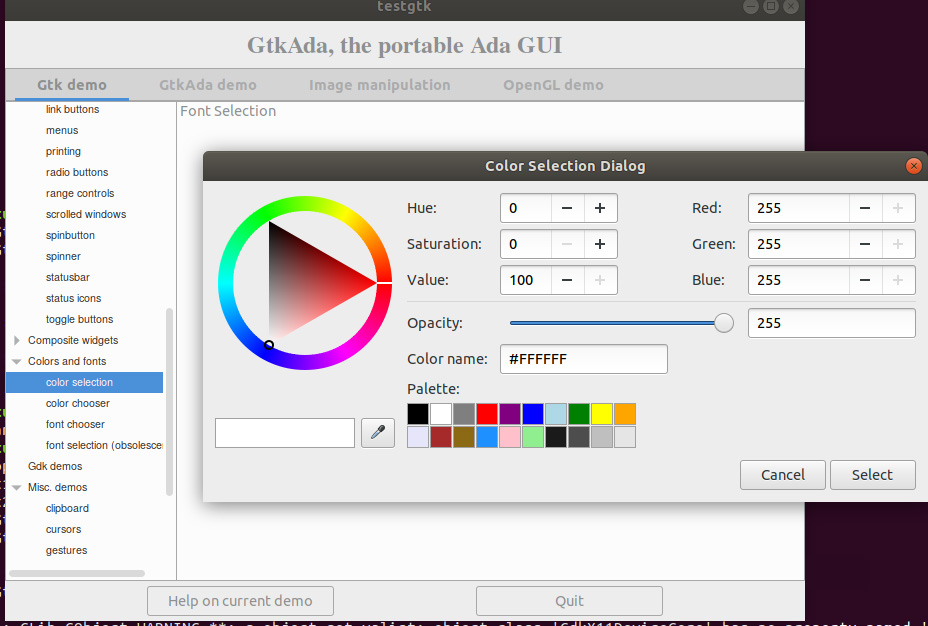
Some warnings and errors are displayed on the console depending on the sample application, but we will neglect them now.

Now we have finished all of the Ada and GtkAda installation.